
An outdoor deck is one of the most rewarding home projects a Texas homeowner can take on. Done right, it extends your living space, adds real value to your property, and becomes the place where family and friends gather for years to come. Done wrong, it’s a safety hazard—and an expensive one to fix.
The difference almost always comes down to the framing. Deck framing is the structural skeleton beneath everything you see—the posts, beams, ledger board, and joists that carry the weight of the deck surface, the people on it, and everything else. Get the framing right and your deck will last decades. Get it wrong and you’re looking at rot, bounce, sag, or worse.
This guide covers the fundamentals of deck framing: what the components are, how they work together, what materials and fasteners to use, and what Texas homeowners specifically need to think about when planning and building a deck. We’ll also address the most common questions that come up—from nail sizes and lumber dimensions to post spacing and pressure treatment.
What Is Deck Framing?
Deck framing refers to the structural framework that supports a deck’s surface. It’s everything underneath the decking boards: the posts that transfer load to the ground, the beams that span between posts, the joists that run perpendicular to the decking and carry the surface load, and—if the deck is attached to the house—the ledger board that anchors the whole structure to the home’s rim joist or band board.
Think of deck framing as the foundation of your deck. Just like a house can only be as good as what it’s built on, your deck surface is only as good as the framing beneath it. The decking boards, railings, stairs, and finishes are all downstream of the structural frame—and no amount of beautiful composite decking will compensate for a frame that’s undersized, improperly fastened, or built from the wrong materials.
Key Components of a Deck Frame
Before diving into materials and how-to, it’s worth knowing the vocabulary. Here are the primary structural elements of a typical deck frame:
Ledger Board
On an attached deck—one that connects to the house—the ledger board is the horizontal member bolted directly to the home’s framing. It carries one end of the joists and transfers load from the deck into the house structure. The ledger connection is one of the most critical (and most frequently failed) elements of deck framing. It must be properly flashed to prevent water infiltration behind it, and it must be fastened with the correct hardware into solid structural framing—not just siding or sheathing.
Posts
Posts are the vertical members that transfer the deck’s load down to the footings and into the ground. Most residential decks use 4×4 or 6×6 posts, depending on height and span requirements. For decks taller than 8 feet above grade, 6×6 posts are generally required by code. Posts must be set plumb and anchored to properly sized footings—more on footings below.
Footings
Footings are the concrete pads or piers that the posts sit on. They transfer the deck load into the soil and prevent the posts from shifting or sinking over time. Footings must extend below the frost line—though in most of Texas, the frost line is shallow or essentially nonexistent in South Texas, which simplifies footing depth requirements compared to colder climates. That said, footings still need to be sized correctly for the load they carry and set in undisturbed or properly compacted soil.
Beams
Beams span horizontally between posts and carry the load from the joists above them. Beam size depends on the span (distance between posts) and the tributary area of deck they’re supporting. Common beam sizes include doubled 2x10s or 2x12s, or engineered lumber products like LVL (laminated veneer lumber) for longer spans. Your local building code—and the span tables within it—will specify the minimum beam size for your configuration.
Joists
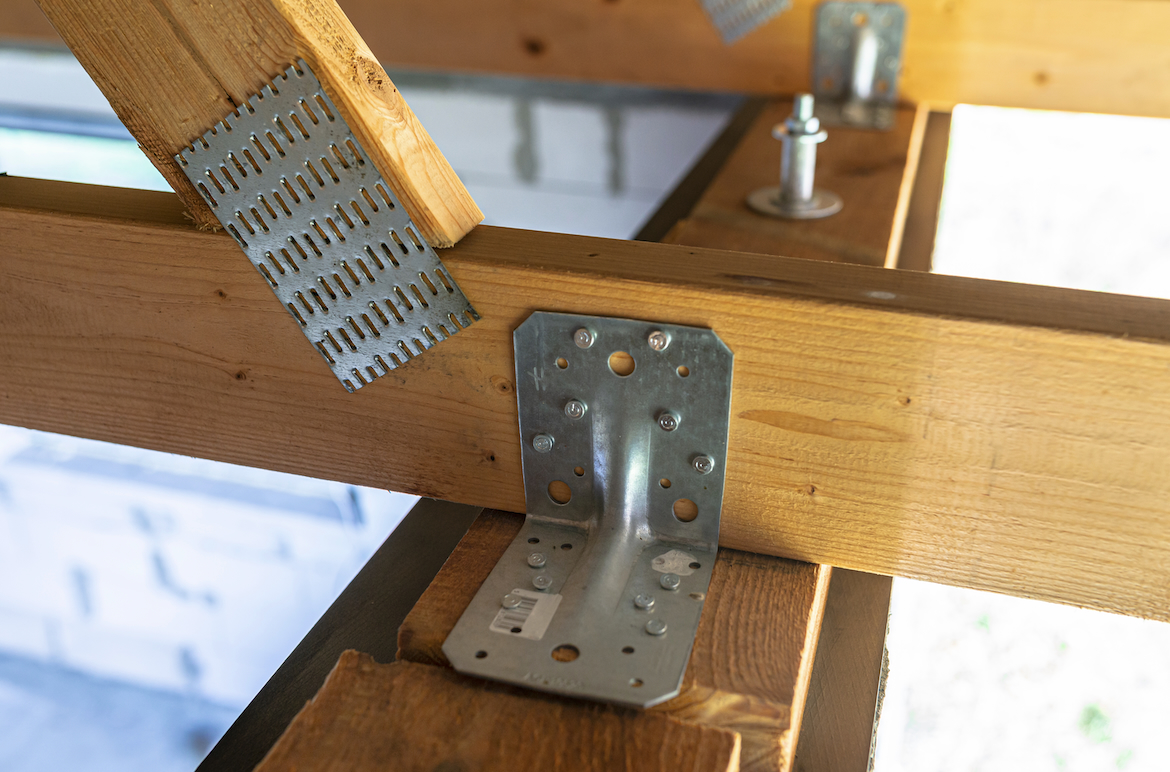
Joists are the horizontal framing members that run perpendicular to the decking boards and span between the ledger (or a beam) on one end and a beam on the other. They’re the primary structural element that the decking attaches to. Joist spacing is typically 12”, 16”, or 24” on center, depending on the species, size, and span of the lumber. Joists are installed with hangers at each end—metal connectors that hold the joist in place and transfer load properly at the connection.
Rim Joists and Blocking
The rim joist runs along the perimeter of the deck, capping the ends of the interior joists and forming the outer edge of the frame. Blocking—short pieces of lumber cut between joists—is added to prevent joists from twisting or rolling, and is often required mid-span on longer joist runs.
What Size Lumber for Deck Framing?
Lumber sizing for deck framing depends on what the member is doing, how far it spans, and how much load it carries. Here are the most common sizes used in residential deck framing:
- Joists: 2×8 is the most common joist size for typical residential decks with 16” on-center spacing and spans up to around 13–14 feet. 2×10 joists allow longer spans or wider spacing. For shorter spans under 8 feet with 16” spacing, 2×6 joists may be sufficient—but check your local span tables.
- Beams: Beam sizing varies significantly by span and load. A common rule of thumb is doubled 2×10 or 2×12 lumber for beams spanning 8–12 feet between posts. For longer spans, engineered lumber (LVL) is often the right choice.
- Posts: 4×4 for decks under 8 feet above grade; 6×6 for taller decks or anywhere local code requires it. Some jurisdictions now require 6×6 posts for all applications—check your local code.
- Ledger board: Typically the same depth as the joists—a 2×10 ledger for 2×10 joists—so the tops of the joists align flush with the top of the ledger.
Always verify sizing against current IRC (International Residential Code) span tables or your local municipality’s adopted code. In Texas, most municipalities adopt the IRC with local amendments. What’s acceptable in one city may differ from requirements in another.
Does Deck Framing Need to Be Pressure Treated?
Yes—in virtually all cases, deck framing lumber must be pressure treated. This isn’t optional or a matter of preference: it’s required by code and by common sense.
Deck framing is exposed to moisture, ground contact (for posts and footings), and—in Texas—the outdoor elements year-round. Untreated lumber in these conditions will rot and decay, potentially within a few years. Pressure-treated (PT) lumber is infused with preservative chemicals under pressure, making it resistant to rot, fungal decay, and insect damage.
The treatment level matters. Lumber is rated by the retention level of preservative chemicals:
- UC4A or UC4B: Required for posts and any framing in contact with the ground or embedded in concrete.
- UC3B: Appropriate for above-ground framing exposed to weather—joists, beams, ledger.
In Texas’s climate—hot, humid summers, frequent storms, and high insect activity including termites, which are common throughout the state—pressure treatment is especially important. Do not cut corners here. A deck frame built with untreated or improperly treated lumber will fail prematurely in our environment.
How Long Does Deck Framing Last?
Well-built deck framing using properly rated pressure-treated lumber can last 30 to 50 years or more. The variables that most affect longevity are:
- Lumber quality and treatment level: Higher-quality PT lumber with the correct retention rating for its application will outperform budget lumber significantly.
- Fastener quality: Standard steel fasteners will corrode in contact with PT lumber (the preservative chemicals are corrosive to bare metal). Always use hot-dipped galvanized or stainless steel fasteners—more on this below.
- Drainage and ventilation: Framing that stays wet—because of poor drainage, inadequate clearance from the ground, or debris buildup—will decay faster even with proper treatment.
- Maintenance: Decking boards and surfaces that are kept sealed and maintained protect the framing below from excessive moisture exposure.
- Texas heat and UV: While PT lumber handles moisture and insects well, prolonged UV exposure can dry and check the wood over time. Extreme drying and checking can create entry points for moisture.
A frame built with quality materials and proper fasteners by an experienced contractor—and kept in reasonable condition—should comfortably outlast the decking surface above it.
What Size Nails for Deck Framing? (And Can You Use a Framing Nailer?)
Nail Sizes for Deck Framing
For structural deck framing connections—nailing joists to beams, blocking, and rim joists—the standard is 16d (16-penny) nails, which are 3.5 inches long. These are used for face-nailing and toe-nailing framing members together. For joist hangers and metal connectors, use the specific nail size specified by the hanger manufacturer, typically 10d or 16d depending on the hanger size and hole pattern.
Critical: all nails and fasteners used in deck framing must be corrosion-resistant. Hot-dipped galvanized (HDG) nails are the minimum standard for use with pressure-treated lumber. For maximum longevity—especially in coastal Texas environments—stainless steel fasteners are worth the premium. Do not use standard bright steel nails with PT lumber; the preservative chemicals will cause them to corrode rapidly, and corroded fasteners weaken structural connections.
Can You Use a Framing Nailer for Decking?
Yes—with caveats. A framing nailer can absolutely be used for structural deck framing work: driving nails through rim joists into joist ends, toe-nailing joists to beams, and other framing connections where a 16d nail is appropriate. It’s faster than hand-nailing and equally strong when done correctly.
The distinction is between framing and decking. A framing nailer is used for the structural frame—the posts, beams, joists, and ledger. For installing the actual deck surface boards, a dedicated decking nailer or, more commonly, screws are used instead. Screws provide better holding power for decking, resist the tendency of surface boards to pop up over time, and allow for easier replacement of individual boards down the road.
One more note: joist hangers and metal connectors must be fastened with the nail type and size specified by the manufacturer—usually short joist hanger nails (1.5” or 1.75”) rather than full-length framing nails. Using the wrong fasteners in hangers voids their load rating and creates a structural deficiency that won’t be visible until the deck fails.
How to Frame a Deck: The Basic Sequence
Whether you’re framing a simple ground-level deck or a raised deck attached to the house, the basic framing sequence follows a logical order. Here’s how it typically unfolds:
Step 1: Design and Permits
Before a single board goes up, you need a plan—and in most Texas municipalities, a permit. Deck permits are required for decks above a certain height (usually 30 inches above grade) and for any deck attached to the house. Permitting requires submitted plans showing the deck layout, dimensions, lumber sizes, footing details, and connection hardware. Don’t skip the permit—unpermitted decks create problems at resale and may have to be removed or brought up to code at your expense.
Step 2: Lay Out and Dig Footings
Mark the deck footprint with stakes and string lines, ensuring everything is square. Then dig footings at the locations specified in your plans. In Texas, footing depth is typically 12–18 inches—verify with your local building department, as requirements vary by county and municipality. Pour concrete footings and set post bases or anchor hardware while the concrete is wet, checking for level and alignment before it cures.
Step 3: Install the Ledger (for Attached Decks)
For a deck attached to the house, the ledger goes up before the posts. Remove siding at the attachment point and bolt the ledger directly into the house’s rim joist or structural framing using lag screws or through-bolts at the spacing specified by code. Proper flashing is critical here—a z-flashing above the ledger and sill flashing at the bottom direct any water that gets behind the siding away from the connection and out of the wall assembly. This detail gets skipped on amateur builds and causes rot inside the wall within a few years.
Step 4: Set Posts
Once footings have cured, set posts on the post bases. Check each post for plumb on two perpendicular faces and brace it temporarily while you continue. Posts can be cut to final height later, or pre-cut if your elevation is tightly controlled. How far apart deck posts should be depends on the beam span—typically 6 to 12 feet on center for most residential decks, with the specific spacing dictated by the beam size and load. Your permit plans will specify this.
Step 5: Install Beams
Beams sit on top of—or are notched into—the posts, depending on your design and local code preferences. Set the beams, check for level, and fasten with the specified hardware (typically post caps). If you’re using doubled lumber for beams, fasten the plies together with nails or bolts at the spacing specified by the manufacturer or code.
Step 6: Install Joists
Mark joist layout on the ledger and beam, then install joist hangers at each location. Set joists into the hangers—always install crown-up so they tend to flatten under load rather than sag—and fasten with the correct hanger nails. Install blocking mid-span if required and add the rim joists around the perimeter.
Step 7: Framing Inspection
Most jurisdictions require a framing inspection before you install the decking surface. The inspector will verify footing depth and sizing, ledger fastening and flashing, post and beam connections, joist sizing and spacing, and hardware. Don’t cover the framing until it’s inspected and approved.
Ground Level vs. Raised vs. Freestanding Decks: What Changes?
Ground Level Deck Framing
A ground level deck sits close to grade—typically less than 30 inches above the ground at all points. This can simplify construction: you may be able to use smaller footings, and some low decks don’t require guardrails. However, ground-level decks have unique challenges: clearance from the ground is minimal, which reduces airflow under the deck and accelerates moisture buildup. This makes the choice of framing materials and fasteners even more critical.
For very low decks, ventilation is worth designing into the plan. Even a few inches of clearance between the bottom of the framing and the ground makes a significant difference in how well the wood dries out between rain events.
Raised Deck Attached to the House
A raised deck—typically anything more than 30 inches above grade—requires a ledger connection to the house or a freestanding structure with its own support. Guardrails are required at this height (typically 36–42 inches depending on height and local code). Post sizing and footing requirements increase with deck height, and the lateral bracing of taller posts becomes an engineering consideration.
For a raised deck attached to the house, the ledger connection carries significant load—and significant consequence if it fails. This is the most common point of catastrophic deck collapse. Ledger fastening specs are not a place to improvise; follow the code table for lag screw or through-bolt diameter, embedment depth, and spacing exactly.
Freestanding Decks
A freestanding deck is not attached to the house—it’s entirely self-supporting on its own posts and footings. This eliminates the ledger connection and its associated flashing and fastening complexities. The tradeoff is that freestanding decks require posts and footings on all four sides and need lateral bracing—either through diagonal bracing between posts or by the rigidity of the frame itself—to resist racking forces. Freestanding designs are often the right choice when attaching to the house is difficult or when the house structure isn’t suitable for a ledger connection.
Pool Deck Framing Plans: Special Considerations
Deck framing around a pool follows the same fundamental principles as any deck, but with a few additional factors:
- Constant moisture exposure: Pool splash-out, wet feet, and hose-down cleaning mean pool deck framing stays wet more often than most decks. Use the highest appropriate PT retention level and pair it with stainless steel or hot-dipped galvanized fasteners throughout.
- Chemical exposure: Pool chemicals—especially chlorine—are corrosive to some metal hardware. Specify hardware rated for this exposure and avoid aluminum connectors in high-chlorine environments.
- Slip resistance: Framing span spacing affects decking material options. If you’re planning grooved composite decking or narrow-width boards for better drainage and slip resistance, make sure joist spacing supports the decking product’s span rating.
- Above-ground pool platform independence: When framing a two-level deck around an above-ground pool, the upper platform framing must be fully self-supporting. Pool walls are not structural elements; the deck frame must not transfer lateral force into the pool wall.
Deck Framing in Texas: What’s Different Here
Texas throws some specific curveballs at deck builders. If you’re in the Austin or San Antonio metro area, here’s what to factor into your planning:
Expansive Clay Soils and Footing Movement
Central Texas’s clay-rich soils shrink during dry spells and swell when wet. This movement can shift footings over time, especially shallow ones. While Texas doesn’t have a significant frost heave concern, the swell-shrink cycle of expansive clay can move footings vertically. Properly sized footings poured into undisturbed soil—and in some cases drilled piers rather than spread footings—provide better long-term stability in areas with highly expansive soils.
Heat and UV Degradation
Texas summers are brutal. Sustained temperatures above 100°F, combined with intense UV radiation, accelerate the natural checking and cracking of PT lumber. The framing itself is less affected than the decking surface, but exposed rim joists and visible beam faces will weather and check if left uncoated. Applying a UV-protective finish to exposed framing elements helps slow this process.
Termites
Texas has one of the highest termite pressures in the country. Pressure-treated lumber with the appropriate retention level provides significant protection, but it’s not absolute—particularly as the treatment fades over time. Eliminate soil-to-wood contact wherever possible, maintain clearance between the bottom of framing and the ground, and consider a termite treatment or barrier system if you’re building in an area with known subterranean termite activity.
Local Permitting Variation
Texas doesn’t have a statewide building code for residential construction—individual municipalities adopt their own codes, typically based on the IRC with local amendments. What’s required in Austin may differ from requirements in San Antonio, Georgetown, or Buda. Always verify permit requirements, setback distances, and code specifics with your local building department before starting work.
DIY Deck Framing vs. Hiring a Professional: What to Know
Deck framing is one of those projects where the gap between a competent DIY build and a professional build is meaningful—and where mistakes aren’t always visible until something fails.
A straightforward, small ground-level deck can be a manageable project for a skilled, detail-oriented DIYer with some construction experience. But several factors push a project firmly into professional territory:
- Ledger connections: Improperly fastened or flashed ledgers are responsible for many deck collapses. The engineering and execution of this connection is not where to experiment.
- Elevated decks: Anything significantly above grade involves structural engineering of posts, bracing, and connections that carries real consequence if it’s undersized or under-fastened.
- Permitting complexity: Getting plans approved, managing inspections, and navigating code requirements in Texas municipalities takes experience and knowledge of local processes.
- Soil and footing conditions: Knowing how to size footings for your specific soil type and load requires experience with local conditions.
- Speed and quality: Professional framing crews work efficiently and catch details—crown orientation, blocking requirements, hanger nail specs—that are easy to miss for someone building their first deck.
Even if you plan to handle the decking surface yourself, having the structural framing done by a professional is a reasonable approach—it ensures the foundation is right and the permit process goes smoothly.
For a broader look at how framing fits into a home build or renovation, see our post on house framing basics with a Texas builder.
Deck Framing Services in Austin, San Antonio & Surrounding Texas Areas
Apex Group provides residential and commercial framing services throughout Austin, San Antonio, and the surrounding Texas metro areas, including stick framing, panel framing, deck framing, and structural framing. Our framing crews work with precision and efficiency, and we understand the specific conditions—soils, climate, local code—that affect how decks are built here in Central Texas.
Whether you’re planning a simple backyard deck, a raised deck off your second floor, or a poolside platform, we can help you build it right—from footing design through the final framing inspection.
Learn more about our deck framing services and our full range of framing services, or contact us to discuss your project and get a free estimate.